You can stock it with pencils and a sharpener and an A5 sketchbook and always be ready to sketch!
Or maybe you'd prefer some marker pens - whatever, it's roomy enough to carry plenty of art supplies, although it would be easy enough to change the dimensions to suit your own needs.
It's quite quick and easy to make (the pattern is just rectangles) and it has room for pencils, pens, a small ruler, a rubber (that's an eraser if you're in the USA - I have a sneaking suspicion that a rubber is something else altogether over there!), and a nice chunky A5 sketchbook.
If you like my sketchy stitching, then you can easily emulate it with black thread, just by sewing each seam at least 3 times and making your stitching slightly wavy.
If you don't like the sketchiness, simply use a straight stitch in a matching thread.
You'll need:
- main fabric - you'll need two pieces each measuring 48cm x 30cm. I used a gorgeous heavy cotton canvas from Wholeport for the main fabric
- scraps of fabric for the pockets - I used several different cotton prints (which pick out some of the colours in the main fabric) from my stash for the pockets.
- a zip - I think mine was 25cm, but a little shorter or longer would both work
- binding - I used bias binding, but because there's no need for stretchiness or give, cotton tape would do just as well, and possibly even ribbon.
- fusible interfacing 48cm x 30cm
Cut out:
2 main pieces: 48cm x 30cm (plus one the same size of fusible interfacing)
pencil pouch: one piece 16cm x 30cm and another piece 11cm x 30cm (they'll be doubled for strength and durability)
small pockets for sharpener/rubber: one piece measuring 15cm x 6cm (again, this will be doubled)
pocket for sketchpad: cut one piece which measures 20cm x 32cm and another piece measuring 24cm x 32cm
How to Make your Sketchbook Pouch:
Iron the interfacing to one of the main pieces. Make this one the piece you sew your pockets to. Put the other piece to one side for now.
Place the two sketchbook pocket pieces together, wrong sides facing, and fold over the excess fabric twice, making a hem along one long edge.
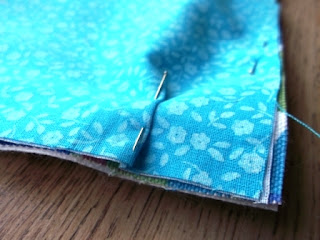
Sew the pocket into place along three edges, keeping close to the raw edges and making two tucks along one 32cm edge as you go (this will help accommodate a thick sketchpad).
close-up of the tuck
Fold the two pencil pocket pieces and small sharpener pockets in half to make double thickness pockets.
Place the folded edges onto the zip. Sew along both sides of the zip.
Place the small pocket at the bottom of the zip, folded edge uppermost. Sew the on pocket as shown below, sewing right across the zip. This will create two small pockets at the same time as creating a neat little stop for the zip.
Pin into position on the backing fabric. Place bias binding, tape or ribbon over the two long raw edges. Sew into position, 8cms away from the left edge.
Sew 100cm of bias binding in half lengthways. Stitch along both long edges. Stitch in place centrally on second piece of main fabric (the one you put to one side earlier), not taking it to the edge but leaving at least 3cm on one side and 6cm on the other. The 3cm side will form the overlap on the outside.
Place both main fabrics together, wrong sides facing, taking care that the overlap on the outside will finish up on the side you want it. Sew bias binding around all four edges.
Insert sketchpad and pencils, tie a bow in the loose bias tape and then a knot where you would like the ends of the bias tape. Trim close to the knot.
Happy sketching!


7 comments:
oooooh I might just have to make one of these - I often have loose pencils rattling around my bag. thanks for sharing the tutorial
Really lovely idea, thanks for the tutorial x
I love the 'sketchy' stitching on this and on the other things you've shown on your blog - it appeals to my way of working but I am afraid to do it on my items for sale in case it looks like I just can't sew straight (true - which is why this style appeals to me!
Such a good idea:) Now I can have my crochet hooks, sketchbook and all the gubbins in one place. Can't wait to make one x
I'm glad people are liking this! I'm planning to take mine on holiday with me this summer. We're renting a cottage that looks out over the sea, so I'm planning on soaking up the inspiration that always comes from the coast!
Ali - does it matter what people think? I love the sketchy style, and I'd love to hear more from people trying it who think they can't sew straight. I had "sewing in a straight line" techniques drummed into me at school as a teenager but it would be good to hear how this works for others. (Tip: straight sewing - especially to begin with - relies on a guide, such as the edge of the presser foot or tape/marker pen on your machine). Look at the guide as you sew, not your stitching.
It`s very cute.Thanks for the tutorial!
Beautiful and practical! Thank you so much for this creative post!
Ananasa.com- Home For Handmade
Post a Comment